Backlighting in Automotive Silicone Keypad Design
- Share
- publisher
- FromRubber
- Issue Time
- Nov 19,2026
Summary
A backlit legend is an aperture, not a print. Brightness unevenness and light leakage are decided by wall thickness, internal geometry and ink coverage long before the LED is chosen. A design-focused guide for automotive scanner keypads.
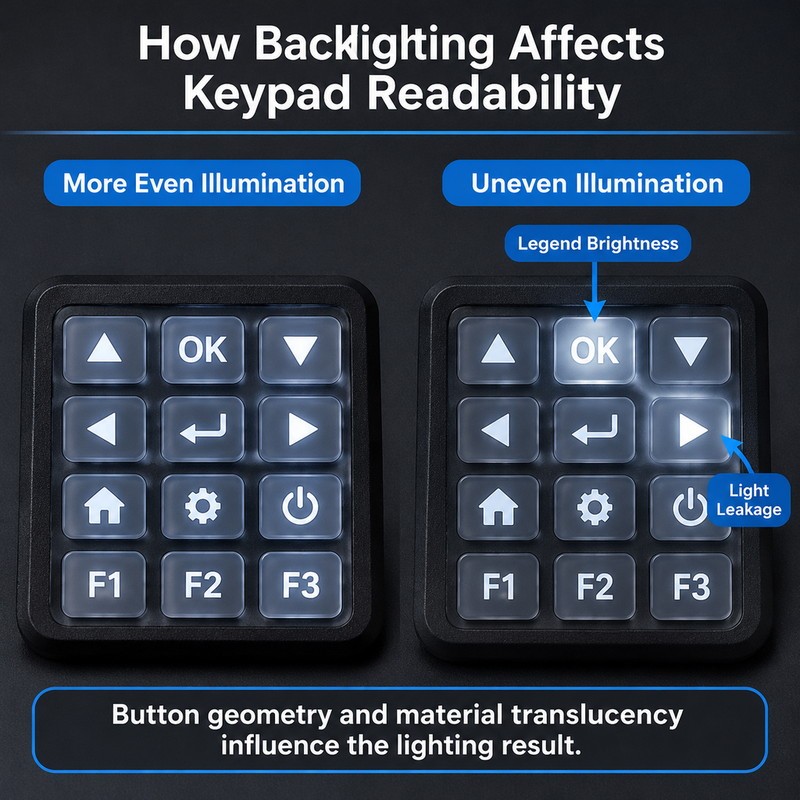
A scanner keypad that looks fine in daylight can fail its first night shift review for a reason nobody predicted: one symbol is twice as bright as the one beside it, and the light bleeds through the gap between two keys.
The usual response is to ask the LED supplier for a brighter or dimmer part. That rarely fixes it, because the LED is only one term in a chain of three, and the other two are decided in the mould and in the print.
It helps to stop thinking of a backlit legend as printing. A backlit legend is an aperture. The ink blocks light, the gap in the ink lets it through, and what the operator sees is the product of how much light reaches the button, how much survives the wall, and how cleanly the aperture is defined. Each of those is a separate engineering problem with a different owner.
Why Does Backlighting Change the Design Requirements of Automotive Silicone Keypads?
How Light Transmission Affects Button Visibility in Low-Light Conditions
In a workshop, a diagnostic scanner is read at an angle, often with a cable across the screen, sometimes through a tinted window or under a lift with the bonnet open. The keypad has to be legible when the ambient light is low and the operator’s eyes are adapted to a dark bay. That sets a floor on the light reaching the eye, and the floor is not the same for every symbol: a thin arrow needs more contrast than a solid block letter.
It also sets a ceiling. Symbols that are too bright at night bloom, and a bloomed legend is as unreadable as a dim one. Automotive interior practice has dealt with this for decades; diagnostic tools inherit the same constraint, usually without the same optical design budget.
How Uneven Illumination Can Make Keypad Legends Difficult to Read
The eye is a differential instrument. It adapts to the average and then looks for differences, so a panel with a modest average brightness but tight uniformity reads better than a brighter panel with one hot symbol. This is why “make it brighter” is the wrong brief: it raises the average and leaves the ratio unchanged.
Unevenness has three common sources. Wall thickness variation across the pad, which changes how much light is absorbed before it reaches the legend. Distance from the LED, which falls off quickly and is not corrected by the diffuser if the cavity is shallow. And ink density variation, which changes the aperture rather than the light behind it.
The last one is the most deceptive, because the mould can be perfect and the printing can still produce a visible difference. It is also the cheapest to check: photograph the unlit keypad under raking light and look for density variation before blaming the optics.
How Backlighting Requirements Influence Button Layout and Internal Structure
Once a key has to transmit light, its internal geometry stops being free. The wall has to be thin enough to pass light and thick enough to carry the actuation force. The web between keys has to block light without becoming so tall that it interferes with travel. The space under the key has to accommodate an LED without the dome bottoming out on it.
On a scanner, these constraints meet a compact layout. The result is usually a compromise: certain keys are placed over LEDs and others over gaps, and the ones over gaps need a light guide feature in the silicone to carry light sideways. Every guide feature added for one key steals light from another. It is a distribution problem, not a brightness problem.
How Should Silicone Materials Be Selected for Backlit Automotive Keypads?
Choosing Translucent Silicone for Consistent Light Transmission
Translucent silicone is not transparent. It scatters, and the amount of scattering is what makes a legend look milky or crisp. A compound with high transmission and low scattering gives a sharper legend but shows the LED as a hot spot; a more diffusing compound evens out the hot spot and softens the legend edges.
For a keypad, the usual answer is a diffusing grade with enough transmission to reach the required brightness at the thickness used. That last clause matters: transmission is measured through a thickness, and a compound that looks excellent on a 2 mm plaque can be too dim through a 4 mm button. Transparent silicone keypad work is specified by thickness and target, not by a transmission figure alone.
Balancing Silicone Hardness With Button Flexibility
Hardness affects light only indirectly, through the wall thickness you can get away with. A harder compound allows a thinner wall for the same force, which helps transmission; it also transmits more of the press shock to the dome, which changes feel. A softer compound gives a nicer break but needs a thicker wall, and the thicker wall eats light.
On a scanner keypad the constraint usually comes from the operator wearing gloves. Glove use raises the force the user can apply comfortably and lowers the tactile feedback they receive, so the design leans towards a more defined break rather than a lighter one.
Why Material Color and Thickness Influence Backlighting Results
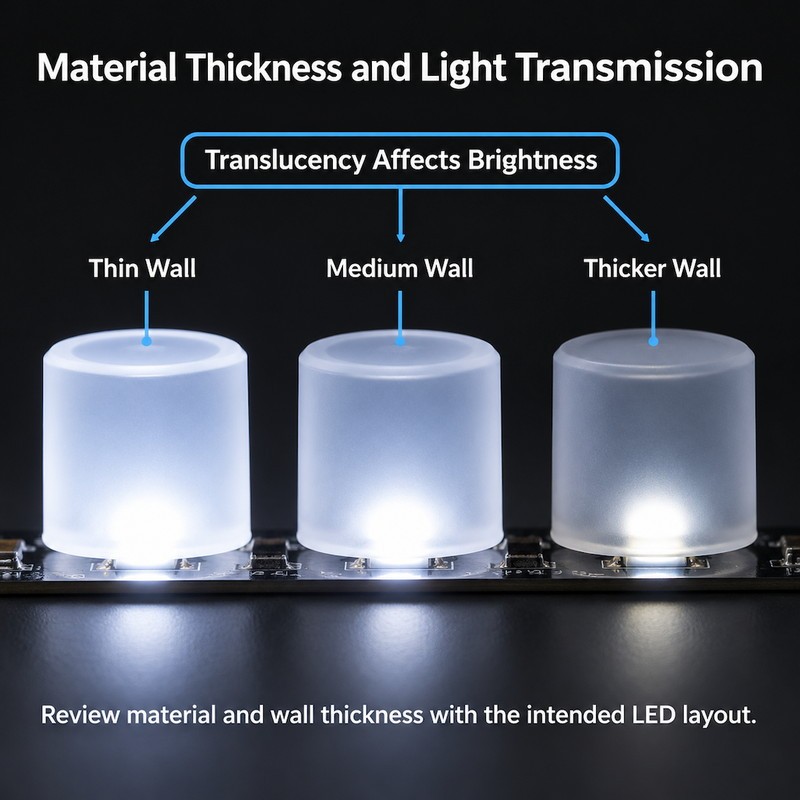
Pigment absorbs. Even a small addition of colour reduces transmission across the visible range, and some pigments absorb unevenly, which shifts the colour of the light that does get through. A keypad that is grey in daylight can look green or blue when backlit, and the shift is not always visible until the LEDs are the only light source.
Thickness is the stronger variable. Transmission falls roughly exponentially with distance through an absorbing, scattering medium, so a wall that is modestly thicker is disproportionately dimmer. On a keypad where button heights vary for ergonomic reasons, this alone can produce the unevenness that gets blamed on the LEDs.
The practical rule: fix the button heights first, then compare candidate compounds at the actual wall thickness of the tallest and shortest keys, not on a flat plaque.
How Does Button Geometry Affect Backlighting Performance?
Designing Button Walls to Control Light Transmission
A button wall does two jobs: it carries force and it carries light. Where both matter, the wall is usually tapered — thicker at the base for stiffness, thinner near the top for transmission. The taper has to be mouldable, which means draft, and the draft has to be consistent or the light path changes around the button.
Tool finish matters here in a way that is easy to overlook. A polished cavity reflects light back into the material; a spark-eroded cavity scatters it at the surface. Two cavities finished differently in the same tool will produce two brightness levels, and the difference will be stable and reproducible, which makes it look like a design fault rather than a finishing one.
Preventing Light Leakage Between Adjacent Buttons
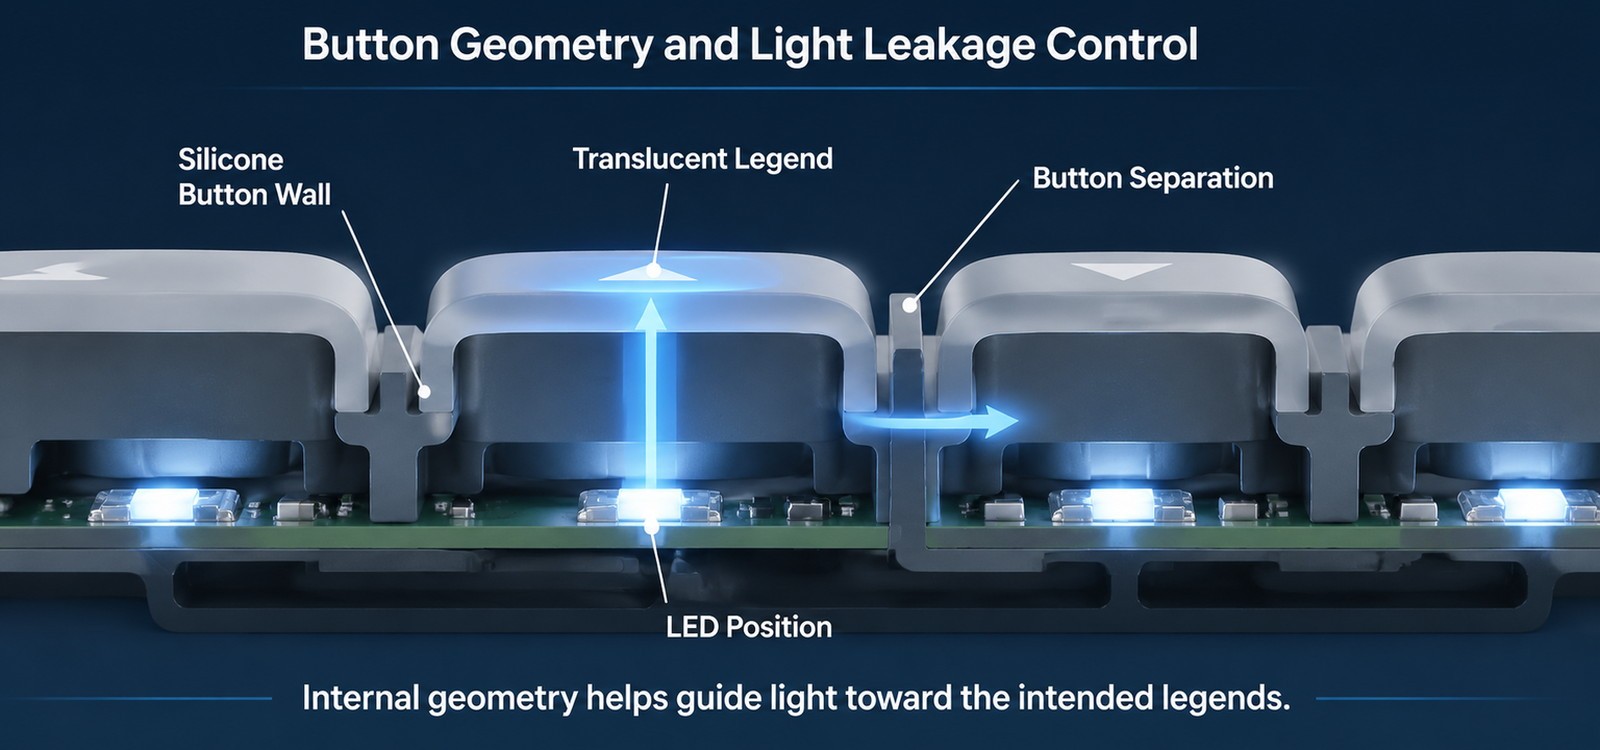
Leakage happens when light travelling sideways in the silicone finds a surface to exit. The web between two buttons is exactly that surface. Solutions are geometric: a taller separating rib, a slot that interrupts the path, or an opaque barrier moulded into the web.
Each has a cost. A taller rib reduces the space available for travel and can make the key feel firm at the edges. A slot weakens the pad and complicates trimming. An opaque barrier usually means a second shot, which is the cleanest optical answer and the most expensive tooling answer.
There is also an assembly contribution that gets missed: if the keypad sits slightly proud of the housing, light escapes around the perimeter of the pad rather than between keys. That is a tolerance stack issue between the keypad flange, the housing recess and the PCB height, not a moulding defect. Chasing it in the tool wastes weeks.
Maintaining Consistent Illumination Across Buttons With Different Shapes
A row of keys rarely has uniform shapes. Direction arrows, an enter key, a function key with a longer legend, a power symbol: each has a different aperture area, and aperture area drives perceived brightness. A large symbol passes more light in total and reads brighter than a small one, even when the light behind them is identical.
The correction is made in print, not in the mould. Ink coverage around a small symbol is increased, or the symbol is printed with a thinner ink film, until the perceived brightness matches its neighbours. That is a printing iteration performed with the LEDs on, which is why sample approval for a backlit keypad has to happen powered up.
Which Printing and Marking Methods Work for Backlit Silicone Keypads?
Using Translucent Legends to Allow Light Through Selected Areas
Most backlit keypads are made by printing an opaque layer over a translucent moulding and leaving the legends unprinted, or by printing a translucent ink into a window cut in the opaque layer. The first is simpler and gives sharper edges; the second allows tinted legends and multi-colour backlighting.
Either way, the legend is defined by what the ink does not cover. Registration therefore matters twice: once for position on the button, and once for the boundary between opaque and translucent, because that boundary is the edge the operator sees.
How Screen Printing Can Control Legend Appearance and Light Blocking
An opaque layer for a backlit key is usually printed in two passes rather than one. A single pass at high thickness cures unevenly and can still transmit a faint glow; two thinner passes give better opacity and better edge definition. The trade is registration between passes, which has to be held tightly or the legend edges go soft.
This is the point where printing skill shows. A supplier who prints backlit panels regularly will have a view on pass count, mesh and ink viscosity for your specific legend. One who prints them occasionally will deliver something that looks acceptable on the bench and glows at the edges in a dark cab.
Considering Laser Etching for Backlit Symbols and Characters
Laser etching cuts through an opaque sprayed or printed layer to expose translucent silicone beneath. It produces very clean edges and no ink to delaminate, which is why it is common on equipment that is cleaned aggressively. The variables are coating thickness uniformity and laser parameters: too much energy and the pocket walls char or the surface around the symbol dulls.
A laser etched backlit control panel shows the same principle used on off-highway equipment, where the panel is cleaned with a hose and the legend has to survive it. The limitation is colour: etching exposes the base material, so a single base colour gives a single legend colour.
| Fault | Mechanism | Design lever | Decided at |
|---|---|---|---|
| One symbol brighter than its neighbours | Wall thickness or aperture area difference | Equalise wall sections; adjust ink coverage | Mould design and print |
| Bright centre, dim edges of a legend | LED hot spot with insufficient diffusion | Diffusing compound, deeper cavity, light guide | Material and mould |
| Glow between keys | Light escaping through the web | Separating rib, slot or opaque barrier | Mould design |
| Glow around the whole pad | Tolerance stack at the housing recess | Flange thickness, recess depth, PCB height | Assembly design |
| Legend edges soft or haloed | Ink bleed or registration between passes | Mesh, viscosity, two-pass printing | Print process |
| Colour shift when lit | Pigment absorption across the spectrum | Compound and pigment selection | Material selection |
| Brightness drops over time | Yellowing of translucent silicone or coating | UV-stable compound; coating choice | Material selection |
How Can Manufacturers Prevent Common Backlighting Problems?
Reducing Brightness Differences Between Individual Buttons
Start with a wall-thickness map of the pad and compare it with the LED layout. Where a thin button sits far from an LED and a thick button sits close, the two errors partly cancel; where they add, the difference is obvious. This comparison takes an afternoon and prevents most of the iteration.
Then set the printing to correct the remainder, and approve it powered. A printed sample checked under office light tells you nothing about the aperture that matters.
Controlling Light Leakage Around Button Edges
Decide early whether the barrier will be geometric or optical. Geometric barriers are cheaper and work well when the pad has room; optical barriers need a second shot and a tool that can hold registration. Hybrid approaches — a short rib plus a dark web — often give most of the benefit at a fraction of the cost, provided the rib is tall enough to interrupt the path at the angle light actually travels.
Preventing Button Deformation From Affecting Illumination
A button that deflects too far closes the gap between the key top and the legend surface, and the light path changes as it is pressed. On a badly balanced key the legend visibly dims during actuation — a small effect that reads as a quality problem to anyone using the tool all day. It is another reason to set wall thickness from force rather than from brightness alone.
What Should Buyers Confirm Before Customizing an Automotive Scanner Silicone Keypad?
Sharing the LED Position and Internal Assembly Layout
Give the LED positions, the PCB height, the dome height and the available cavity depth. Without those, the keypad designer is guessing at distances, and distance is the second strongest variable after wall thickness. A 2D outline is not enough; the vertical stack is where backlighting succeeds or fails.
Confirming Legend Design, Button Dimensions and Light Transmission Requirements
State which symbols must be backlit, which are printed only, what colour the light should be, and how bright is bright enough in your working environment. “Backlit” is a starting point, not a requirement. The useful version names the symbols, the colour, and the ambient light condition the operator works in. There is more on material selection for brightness in this note on high-transparency silicone for backlit keypads.
Evaluating Samples With the Actual Lighting Assembly
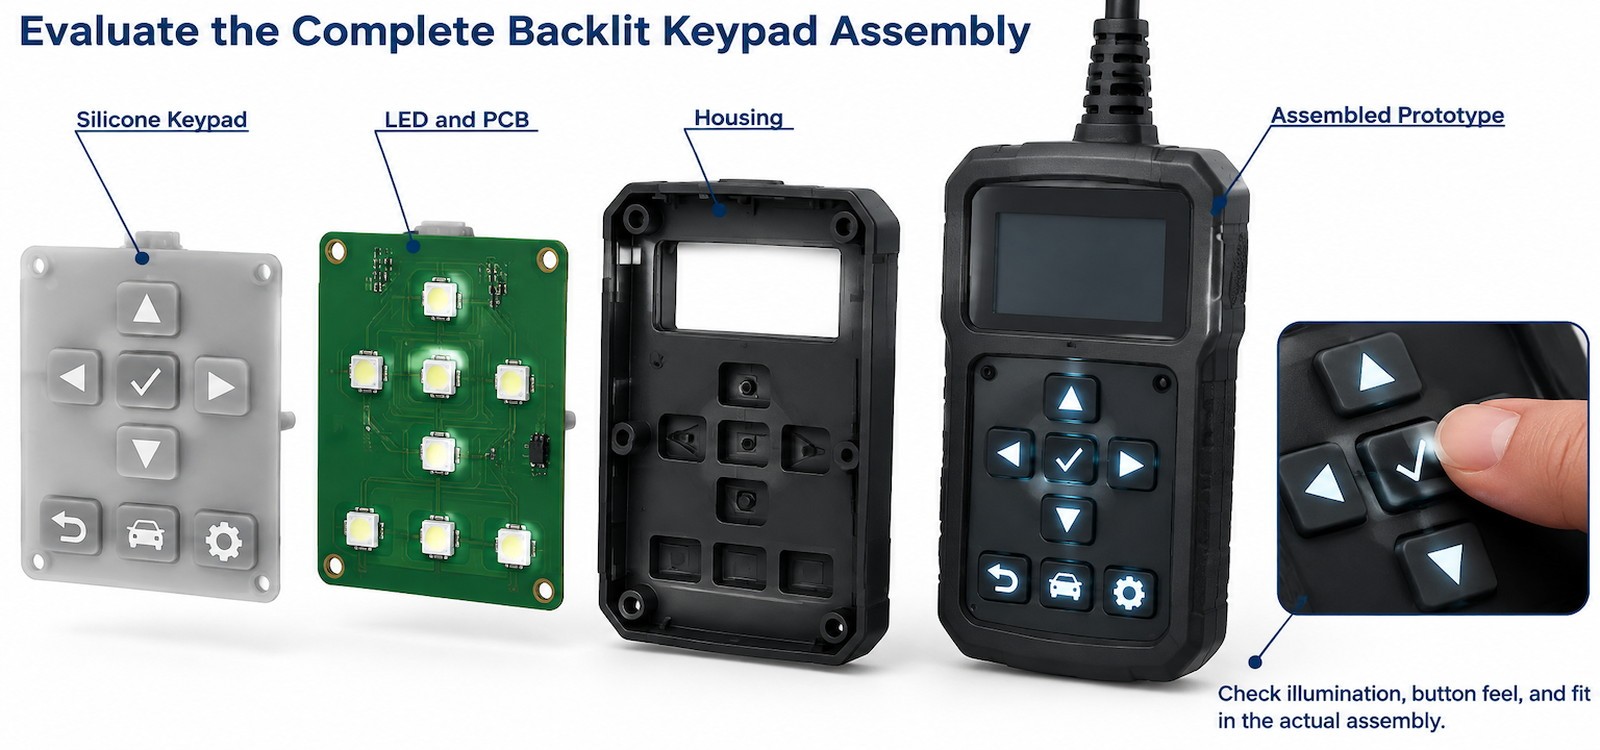
Approve the sample assembled with the production LED board and housing, powered, in a dark room and in the light level of a typical workshop. Photograph it. Then press every key and watch the legends: a legend that dims or flickers under load is telling you the wall is too flexible or the cavity too shallow.
Final Considerations for Backlit Silicone Keypad Design
Backlighting turns a mechanical part into an optical assembly, and the optical performance is set by thickness, geometry and print long before anyone chooses an LED. Brightness can be corrected at the LED; uniformity and leakage usually cannot.
FromRubber, trading name of Dongguan Bohao Electronic Technology Co., Ltd., moulds and prints backlit keypads in Dongguan, including laser-etched panels and two-shot constructions, with the printing and the moulding under the same roof — which is what makes a powered sample iteration practical rather than a three-week round trip. If you have a scanner keypad where the illumination is not behaving, send the LED layout and a photograph of the panel lit; that usually narrows it to one of the mechanisms in Table 1 within a short conversation. WhatsApp and WeChat: +86 18676210913, or through the contact page.
What is not claimed here. No brightness, uniformity or transmission figures are given, because they depend on compound, thickness and LED arrangement, and quoting a number without those inputs would be misleading. Ask for measured samples in your assembly. Where a transmission figure is quoted by a compound supplier, it is normally stated at a defined plaque thickness and wavelength range, measured by a method such as ASTM D1003 or ISO 13468; a value without those two conditions cannot be compared with another supplier’s value.
Frequently asked questions
Can a silicone keypad be backlit without translucent material?
Not usefully. Light has to pass through the button, so at least the legend area must be translucent. The rest of the pad can be opaque, and often is, to prevent leakage between keys.
Why is one legend brighter after a few months of use?
Look for yellowing of the translucent material or the coating over that key. UV and heat change transmission unevenly if the keys see different exposure, and a key beside a heat source can age faster than its neighbours.
Does a brighter LED fix uneven illumination?
It raises the average and leaves the ratio between the brightest and dimmest legend unchanged, so the panel still reads as uneven. Uniformity is a geometry and material problem.
Should the legend be printed or etched?
Printed legends allow multiple colours and are cheaper to change; etched legends have no ink film to peel and tolerate harsh cleaning. Etched legends are limited to the base material colour unless a coating is used.
What information does a keypad manufacturer need to design the backlight?
LED positions and type, PCB and dome heights, cavity depth, housing recess dimensions, which symbols must be lit, the required light colour, and the ambient conditions the operator works in. With those, the wall thickness and print can be designed rather than guessed.