How to Prevent Silicone Keypad Buttons from Sticking on Handheld Industrial Measuring Instruments?
- Share
- Issue Time
- Nov 12,2026
Summary
A keypad that works on the bench and sticks after assembly is a stack-up problem, not a material one. This guide separates interference, adhesion and elastic loss, and shows where clearance and preload are actually decided.
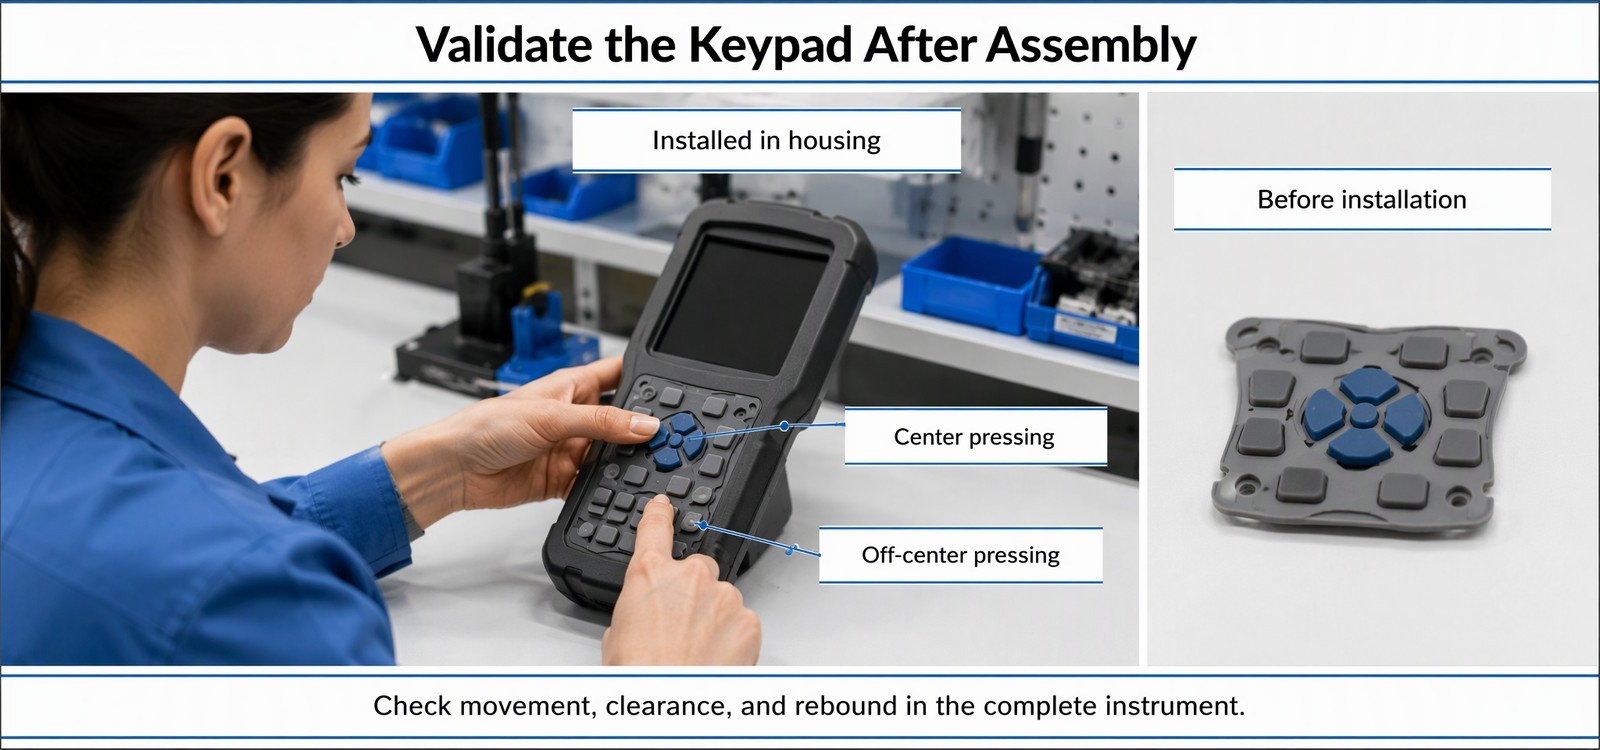
A keypad that passes on the bench and sticks in the instrument is one of the most common reports a custom keypad supplier receives, and it is also one of the most misread. The usual response is to ask for softer silicone. Softness rarely fixes it, because the part did not change between the bench and the housing. Something around it did.
Silicone keypad buttons sticking on a handheld instrument is usually reported as a material fault, and it is usually a clearance one. On a handheld industrial measuring instrument the space around a button is measured in tenths of a millimetre, and that budget is spent by the housing draft, the coating, the flash line, the board thickness and the screw torque before the button ever gets a share of it. This article separates the three mechanisms that produce a sticking key, and shows where each one is actually decided.
Why Do Silicone Keypad Buttons Stick on Handheld Industrial Instruments?
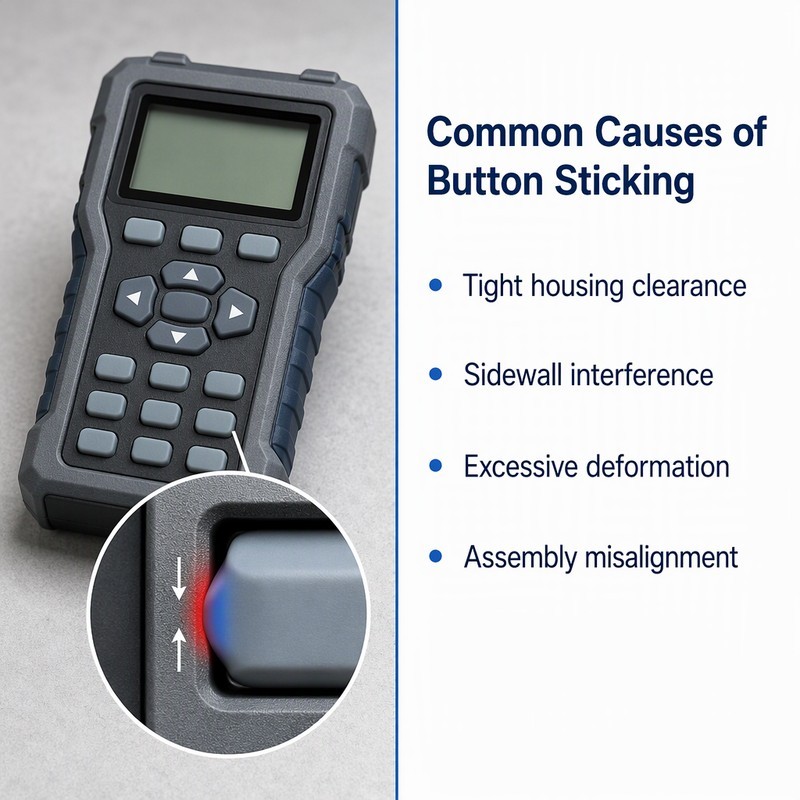
Three mechanisms look identical to the operator and need different fixes. The first is mechanical interference: the button touches the housing and is held by friction. The second is adhesion: the silicone sidewall sticks to the housing wall or to the board and resists the return stroke. The third is elastic loss: the material itself has taken a set or is too slow to recover, so the button returns late or not at all.
A fourth cause is often reported as sticking but is not: the contact closes but the button has no return force left, because the dome was compressed past its working range during assembly. The key stays down because nothing is pushing it back.
| Mechanism | What makes it worse | How to confirm it |
|---|---|---|
| Mechanical interference | Housing draft, coating thickness, flash at the button base | Press at the edge with the cover fitted and watch for contact |
| Adhesion and side friction | Long guided section, glossy opening wall, clean dry surfaces | Compare return speed before and after the housing is wiped |
| Compression set | Sustained preload, over-compression in the stack | Leave it assembled under load, release, then re-check return |
| Lost return force | Dome compressed past its working range during assembly | Measure the travel left at the button top in the assembled unit |
Tight housing openings restrict button movement
A radial gap that looks generous at rest disappears once the button rotates under an off-center press. The button top moves sideways as well as down, and the side that rotates toward the opening wall closes the gap first. On a 10 mm button, a fraction of a millimetre of rotation is enough to consume the clearance on one side.
The opening is also rarely a plain cylinder. Most handheld instruments have a drafted opening, a chamfer at the surface, and a step where the housing halves meet. The narrowest section may be several millimetres below the visible surface, where the operator cannot see the contact and where the button is widest because the skirt has started to flare.
Small dimensional differences matter more here than anywhere else on the part. A button molded a few tenths over its nominal diameter may still assemble, because silicone compresses, and that compression is exactly what produces the friction. The key does not fail; it just stops returning cleanly, and the report says "sticky".
Excessive silicone deformation prevents smooth button return
Silicone returns because it stores energy during compression. Compression set is the part of that deformation the material keeps after the load is removed. If the button is deformed beyond the range where it behaves elastically, part of that energy is lost, and the return is slow or incomplete. Whether that happens is decided by the combination of hardness, wall section and how far the assembly pushes the button before anyone touches it.
Overly soft compounds are the usual suspect and are often the wrong one. A soft button deforms easily, which means it is also easy to over-compress in the assembly, and once it is sitting against a hard stop it has no travel left to give back. A firmer button in the same housing may return better, not because it is stiffer, but because it is less likely to be preloaded past its working range.
Height and wall thickness decide the same question from the other side. A tall button with an unsupported skirt is a lever: the top moves further for the same force, the skirt bends more, and the return path is longer. Shortening the button and supporting the wall turns bending into compression, which is the mode silicone handles best.
Button edges interfere with nearby housing structures
Interference is rarely caused by the opening. It is caused by what sits next to the opening: a rib for stiffness, a boss for a screw, a label recess, a battery door edge, or the parting line of a two-shot housing. These features are drawn for the housing's own needs and are not visible from the front of the panel.
Button spacing makes it worse. Two adjacent keys deform toward each other when pressed, and if the web between them is short, the second key moves slightly as the first is pressed. That movement is small, but on a compact instrument it can be enough to bring a sidewall into contact with a rib that was clear at rest.
The useful review is a section cut through the panel at the tightest point, with the buttons shown in their deformed state rather than at rest. Most interference problems are visible in that single drawing, and none of them are visible in a top view.
Assembly pressure changes the original button clearance
Assembly is where clearance is actually spent. Screws pull the board toward the housing, and the keypad sits between them. If the board is not flat, or if the screw order pulls one corner first, the keypad is clamped unevenly and the keys over the high points are preloaded.
The same applies to any gasket, foam layer or display frame in the stack. A compressible layer that is thicker on one side tilts the whole assembly, and the tilt is transferred to the button clearance. This is why a keypad that moves freely in the tool, and even in a bare housing, can stick as soon as the cover is screwed down.
Assembly sequence belongs in the design review, not only in the work instruction. The order in which screws are tightened and the torque used are part of the keypad's operating conditions, and they should be fixed before the first sample is judged.
How to Design Button Clearance to Prevent Sticking
Match button dimensions with the enclosure opening
On a handheld industrial measuring instrument keypad, clearance is a budget rather than a number. Start from the opening's smallest dimension, subtract the housing draft over the depth the button travels, subtract any coating thickness, and subtract the flash allowance at the parting line. What remains is the space the button actually has, and it is usually less than the drawing suggests.
The button diameter should be specified against that remaining space, with the tolerance band on the button side rather than assumed. A drawing that gives a nominal diameter and a general tolerance is not enough on a compact instrument.
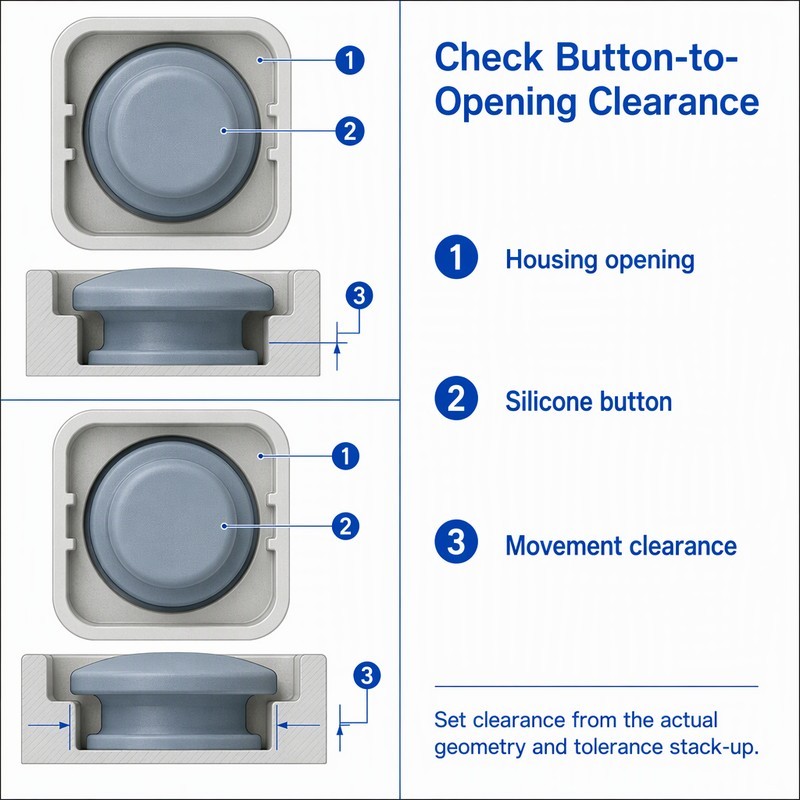
Where the housing cannot be changed, the button can be relieved instead. A short chamfer or a slight taper on the upper sidewall removes the contact at the point where rotation is greatest, and it costs nothing in tooling if it is in the original design. Adding it later means a mold change, which is why it belongs in the first review.
Prevent sidewall friction during button movement
Friction between silicone and plastic is not constant. It rises when the surfaces are clean and dry, falls when they are contaminated with skin oil, and rises again when the plastic has a textured finish. That variability is why one unit sticks and the next one from the same batch does not.
Reducing sidewall contact is more reliable than trying to lubricate it. Options include shortening the guided section so contact happens over a shorter distance, tapering the sidewall so only the base is close to the opening, and putting the locating function on the base rather than on the button wall. Each removes contact area without removing support.
Surface finish of the housing matters as much as the keypad. A glossy plastic opening against a matte silicone has a different friction behavior from a textured one, and if the housing is painted, the paint thickness at the opening edge is part of the clearance budget.
Maintain consistent spacing between adjacent buttons
Adjacent buttons share the silicone web, so they share deformation. If the web is short, pressing one key lifts or shifts its neighbour slightly, and that movement can close a clearance that was designed at rest. On compact handheld instruments, the tightest clearance in the whole assembly is often between two buttons rather than between a button and the housing.
A practical rule is to keep the web span at least comparable to the button wall thickness, and to keep the gap between caps visibly larger than the gap between cap and opening. That way the operator's finger is guided into a defined target, and the deformation has somewhere to go that is not another key.
Critical areas deserve their own check. On a handheld instrument these are the keys next to the display bezel, the keys above the battery compartment, and any key placed close to a screw boss. Those three positions account for most of the interference found at the sample stage.
How Silicone Material and Button Geometry Affect Return Performance
Choose silicone hardness according to the required deformation
Silicone button design should select hardness against the deformation the design needs, not against a preference for soft or firm. If the button has to compress into a shallow space, a softer compound reaches the required travel at a lower force, but it also has less reserve to push back. If the space is deep and the wall is thin, a firmer compound keeps the button from collapsing sideways.
The trade is visible in the return stroke. Soft material plus thin wall gives a light press and a slow return. Firm material plus thin wall gives a light press and a faster return, but a shorter working range. Firm material plus thick wall gives a positive return and a heavy press that may be too much for a key used hundreds of times a shift.
Adjust dome geometry to achieve controlled button movement
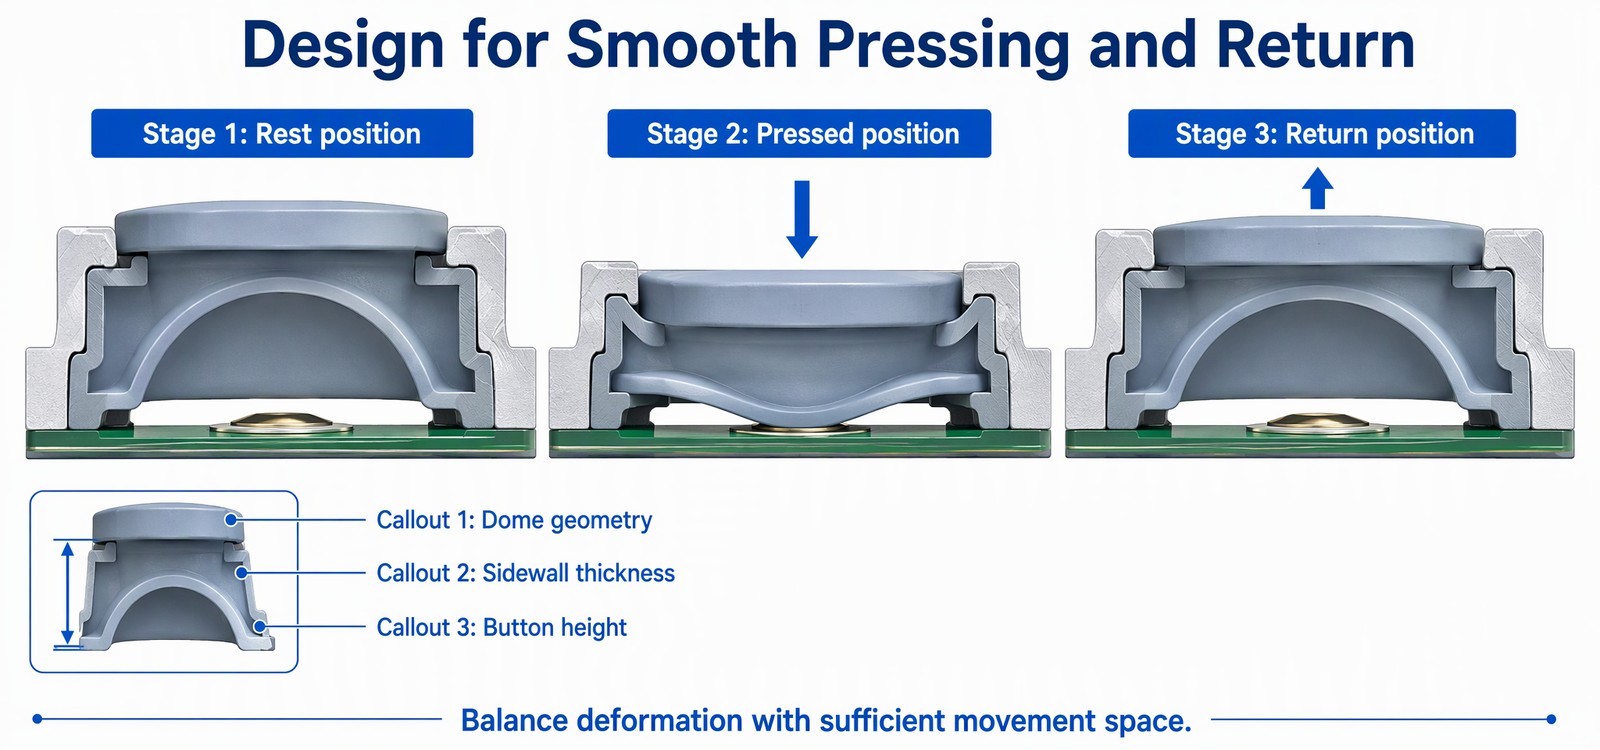
The dome is the spring, and its geometry sets both the press and the return. A dome that inverts cleanly and returns to its original shape gives a defined click and a reliable return. A dome that is too flat may not invert at all, and one that is too tall may invert past the point where it can recover, especially if the housing limits its upward movement.
Dome height, diameter and wall thickness should be evaluated together with the clearance above the button, because the return needs space as much as the press does. If the housing or a label sits directly on the button top, the dome cannot return fully, and the key will sit slightly depressed with no visible cause.
Avoid excessive button height and unsupported sidewalls
A tall button is a lever with a long arm. The higher the cap sits above the skirt, the more the top moves sideways under an off-center press, and the more likely that movement closes the clearance. Reducing height by a millimetre often does more for sticking than any change to hardness.
Unsupported sidewalls are the other half of the problem. Where the skirt has no rib, no step and no support from the base, it bends rather than compresses, and bending is the deformation mode that produces both tilt and slow return. A short internal rib or a stepped base changes the mode without changing the visible design.
The material side of the return stroke is measurable. In the 70 Shore A compound summary published by FromRubber, elongation at break is listed as 150 percent required with 266 percent achieved, and tensile strength as 5.0 MPa required with 5.7 MPa achieved. A high elongation margin is what allows a skirt to bend repeatedly at the transition without cracking, and it is also why a key that is rubbing can keep working for a long time before it fails outright: the material absorbs the abuse quietly. It does not follow that a softer compound fixes sticking, because the interference is still there.
How Mold Design and Manufacturing Affect Keypad Sticking
Control dimensional consistency during silicone compression molding
In custom rubber keypad molding, part dimensions depend on fill, pressure, temperature and cure time as much as on the cavity. Cavity-to-cavity variation in button diameter is the most consequential for sticking, because the button that is on the high side of tolerance is the one that rubs.
Control starts with the tool: cavity dimensions measured before production, balanced fill, and a parting line that does not sit on the button sidewall. It continues in process control: the same charge weight, the same clamping, and a cure that is long enough for the thickest section on the plate, not the average.
Prevent flash from interfering with button movement
Flash is a dimensional defect whenever it lands near a moving surface. A ring of excess material around the base of a button increases its effective diameter exactly where the opening is tightest, and because flash is irregular, the increase is not uniform around the circumference.
The parting line should be positioned below the button's travel zone and away from the guided section. Trimming should be checked with the same instrument used for the diameter measurement, and the check should include the base of the button, not only the visible edges of the plate.
Check button alignment and deformation after demolding
Demolding can distort a keypad in ways that only appear after it cools. A part pulled while still warm can bow, and a bow of a few tenths across a handheld panel is enough to preload the center keys when the cover is fitted.
The check is flatness of the base plus key height measured at several points, done after the part has settled rather than immediately off the tool. Where a batch shows a consistent bow, the cause is usually ejection or cooling rather than the cavity, and adjusting the cavity will not fix it.
How to Test Handheld Instrument Keypads Before Mass Production
Test button movement inside the actual housing
The comparison that matters is the same keypad before and after installation. Press each key loose, then install the keypad, tighten the screws in the production order and to the production torque, and press the same keys again. Any key whose feel changes has a clearance or preload issue in the stack.
Off-center pressing should be part of this test, not an extra. Press each key at the center, then at the edge nearest the tightest housing feature. The difference between the two tells you whether the clearance is adequate for rotation, which is the mechanism behind most "sticky" reports.
Evaluate pressing and rebound across all button positions
Rubber keypad button return problems are easier to rank than to classify, so rebound should be timed, or at least ranked, rather than judged as "returns" or "does not return". A slow return that completes is a different problem from a key that stays down, and on a handheld instrument the slow return is the one that produces double entries in the field.
Testing should cover the largest and smallest keys, the four corners of the panel, and any key adjacent to a boss or a display bezel. Those positions carry the worst combinations of clearance and preload, and they are the ones that generate complaints.
Perform repeated pressing tests under representative conditions
Repeated pressing reveals whether the return degrades. A key that returns cleanly for the first hundred cycles and hangs at a thousand has a friction or set problem that a single press will never show.
The conditions should match the instrument's use. A handheld measuring tool is pressed with a thumb, at an angle, sometimes with a glove, and often with the instrument held in the other hand, which means the housing is flexed while the key is pressed. Testing a keypad clamped flat on a bench does not reproduce that, and the difference is exactly where sticking hides.
Three questions that separate the causes
Does the key stick when the keypad is loose? That points to material or geometry. Does it stick only after the cover is fitted? That points to preload or a boss. Does it stick only when pressed near one edge? That points to clearance for rotation. Answering these three before changing anything saves a mold revision.
Frequently Asked Questions About Sticking Silicone Keypad Buttons
Why do silicone buttons work outside the housing but stick after assembly?
Because assembly changes the boundary conditions. Screws, a gasket, an uneven board or a boss can preload the keypad so that a button starts its travel already touching the opening. The keypad did not change; the space around it did.
Can softer silicone prevent button sticking?
Rarely, and it can make it worse. Softer material deforms more easily under assembly preload and has less reserve force for the return stroke. If the cause is interference or preload, the fix is clearance and support, not hardness.
How much clearance should be left around a silicone keypad button?
There is no universal figure, because the requirement depends on button diameter, travel, rotation under off-center press, housing draft, coating thickness and the flash allowance. Clearance should be calculated from the assembly geometry and then verified on an assembled sample.
Can mold modifications solve rubber keypad sticking problems?
Sometimes. If the cause is an oversized button, flash at the guided section or an unsupported sidewall, a tool change can fix it. If the cause is the housing opening, the assembly preload or a boss, a tool change will only move the problem to a different key.
Where to look first
Sticking is a system symptom. It is worth checking the assembly stack before the material, and worth checking the clearance at the narrowest section before the visible gap. In most handheld instrument projects the answer is a combination: a button that is slightly too tall, an opening that is slightly too tight after coating, and a screw order that preloads one corner.
FromRubber (Dongguan Bohao Electronic Technology Co., Ltd.) molds custom silicone keypads and keypad assemblies for handheld and bench instruments, including designs where clearance, wall support and dome geometry are reviewed against the housing drawing before tooling. Production runs under ISO 9001:2015 and IATF 16949:2016 quality systems, with dimensional inspection on button height, diameter and flatness.
If a custom keypad for handheld measuring instruments is sticking in the field, send the housing section at the tightest point and the assembly sequence: contact the FromRubber engineering team. Keypads for instruments and control panels with tight clearance requirements are listed under custom silicone rubber control panels. WhatsApp and WeChat: +86 18676210913.
Sources and supporting reading
Chasing a key that will not come back up?
Send the housing section at the tightest point, the screw sequence and the keypad drawing. The review separates interference, preload and material set before any tooling change is proposed.
Send the assembly details