What Should Manufacturers Consider When Customizing Silicone Keypads for Laboratory Analyzers?
- Share
- Issue Time
- Nov 12,2026
Summary
A laboratory analyzer keypad has to work through gloves, survive wipes and fit a crowded housing. This guide covers button grouping, material and hardness selection, contact structure and the drawings a supplier needs before tooling.
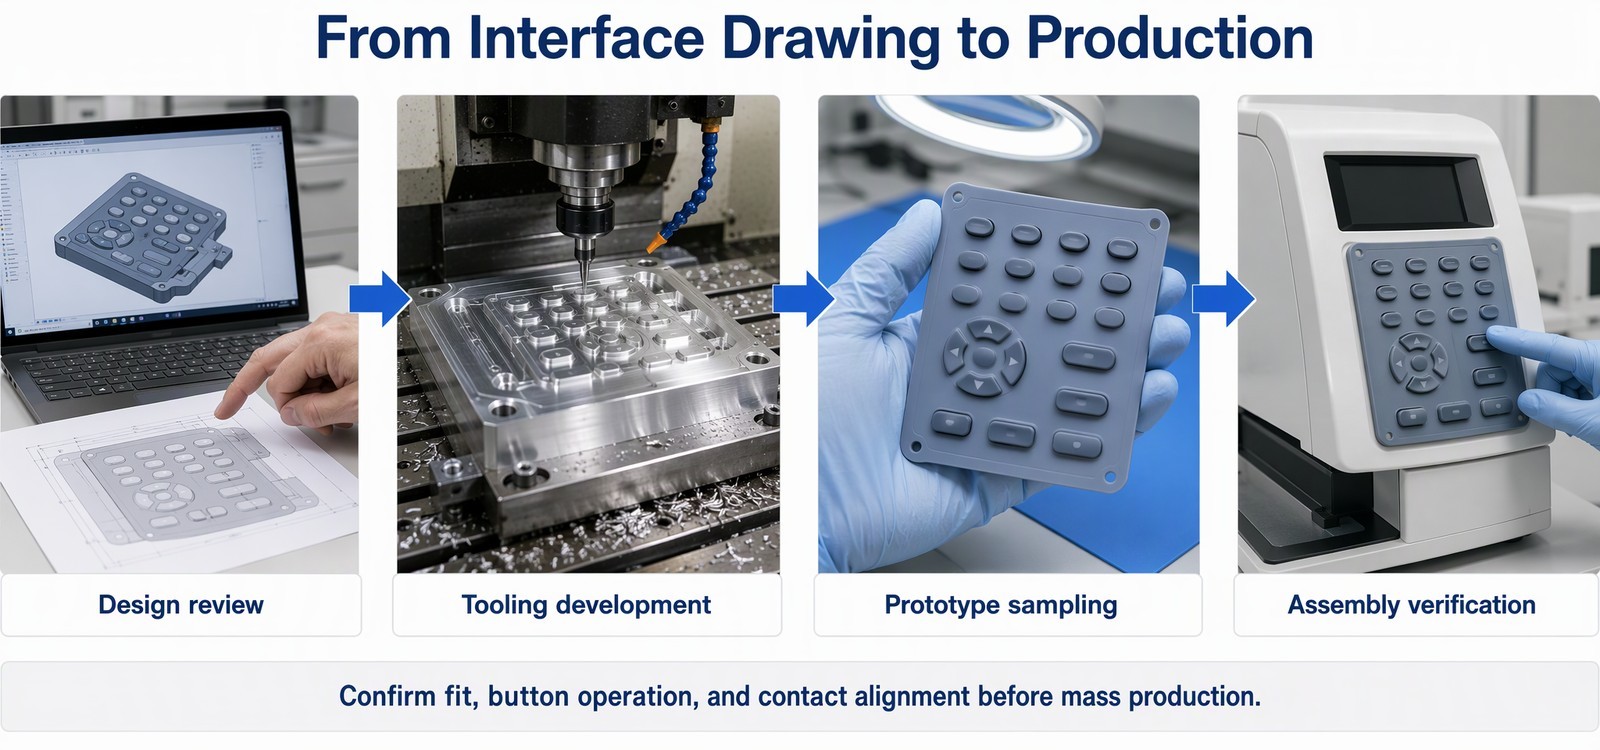
The first prototype keypad comes back from the lab with a note that reads like a contradiction: the keys work, but the technicians keep hitting the wrong one. Nothing is broken. The panel was designed around a drawing of the housing, and the housing drawing never mentioned that every person using it wears nitrile gloves and wipes the surface down twice a day.
Silicone keypads for laboratory analyzers go where consumer electronics never go: wet gloves, solvent wipes, a bench shared with spills, and an operator who is reading a result while pressing a key. This article is about the details that decide whether a custom keypad survives that environment, and about the information a buyer needs to hand over before a mold is cut.
Why Laboratory Analyzers Require Carefully Designed Silicone Keypads
A laboratory equipment keypad is not a single interface. On an analyzer it is at least three: a numeric block for sample IDs and dilutions, a navigation cluster for menus and confirmation, and a row of function keys for start, stop and method selection. Each is used at a different rhythm, and each fails in a different way when it is designed as filler around the others.
| Key group on an analyzer | Press rhythm | Design consequence |
|---|---|---|
| Numeric block | Typed in sequence without looking | Uniform cap size, even pitch, legends readable from standing height |
| Navigation cluster | Found by position, pressed in short bursts | Defined visual boundary and consistent travel across the cluster |
| Function keys (start, stop, method) | Deliberate, low frequency | Larger cap or colour break, firmer breakover |
| Service and setup keys | Rare, sometimes through a glove | Deeper legend contrast and more travel than the entry block |
The environment adds a second layer. Gloves reduce tactile sensitivity and change the contact area of the finger, so a key that gives clear feedback to a bare hand can feel ambiguous through nitrile. Wiping changes the surface, and the wipe is usually aimed at the panel.

Different analyzer functions require different button layouts
Numeric entry is a rhythm task. The operator types a sequence without looking, so the block needs uniform key size, even spacing and a legend that is readable at a glance from a standing position. Consistency inside the block matters more than the shape of any single key; a numeric block where one key is a different size breaks the rhythm and produces entry errors that get blamed on software.
Navigation is a targeting task. Arrow keys and a confirm key are found by position relative to each other, so the cluster should read as one object: a cross, a ring, or a defined group with a visible boundary. If the arrows are scattered among function keys, every menu step becomes a small search.
Function keys carry the consequences. Start, stop, and method selection are pressed deliberately and often with a different intent, which is why they usually deserve a separate visual treatment: a different color, a larger cap, or a gap that separates them from the entry area. The engineering point is that grouping is not decoration. It sets how long the operator's hand stays on the panel, and that decides how much wear each key actually sees.
Frequent operation places additional demands on keypad durability
Repeated pressing is a fatigue problem before it is a wear problem. Silicone returns to shape, but it returns slightly less completely after each cycle, and the rate depends on how far the material is compressed and how long it stays compressed. A key that is held down during a run, or pressed against a hard stop, accumulates that loss faster than a key that is tapped.
Geometry decides how much of the press the material absorbs. A tall button with a thin wall takes the load in bending, and bending is where cracks begin on thin sections. A shorter button with a supported wall takes the load in compression, which silicone handles well. This is why two keypads of the same hardness can have very different service lives on the same instrument.
Cosmetic wear and functional wear should be judged separately. A polished key top, a legend that has lost contrast near the edge, or a slight sheen on the most used key are cosmetic. A key that no longer returns, no longer closes the contact, or has torn at the skirt transition is functional. Mixing the two in one inspection report makes both harder to act on.
The keypad must fit the analyzer housing and internal electronics
The keypad is a layer between a housing opening and a PCB, and it has to respect both. The housing sets the opening, the sealing surface and the screw bosses. The PCB sets the contact pads, the component height around them and the board's own tolerance. The keypad is the part that has to absorb the difference between the two, and it can only absorb what the design allows.
Most fitment problems on laboratory instruments come from one of three places: a boss that sits under the keypad and lifts it locally, a board that is not parallel to the panel because of a connector or a mounting post, or an opening that was dimensioned from the nominal housing rather than from the tolerance band. Each produces the same symptom, a key that is preloaded before it is pressed, and each is found by measuring the assembled stack rather than the parts.
How to Choose the Right Silicone Material for Laboratory Analyzer Keypads
Select silicone hardness according to button size and pressing requirements
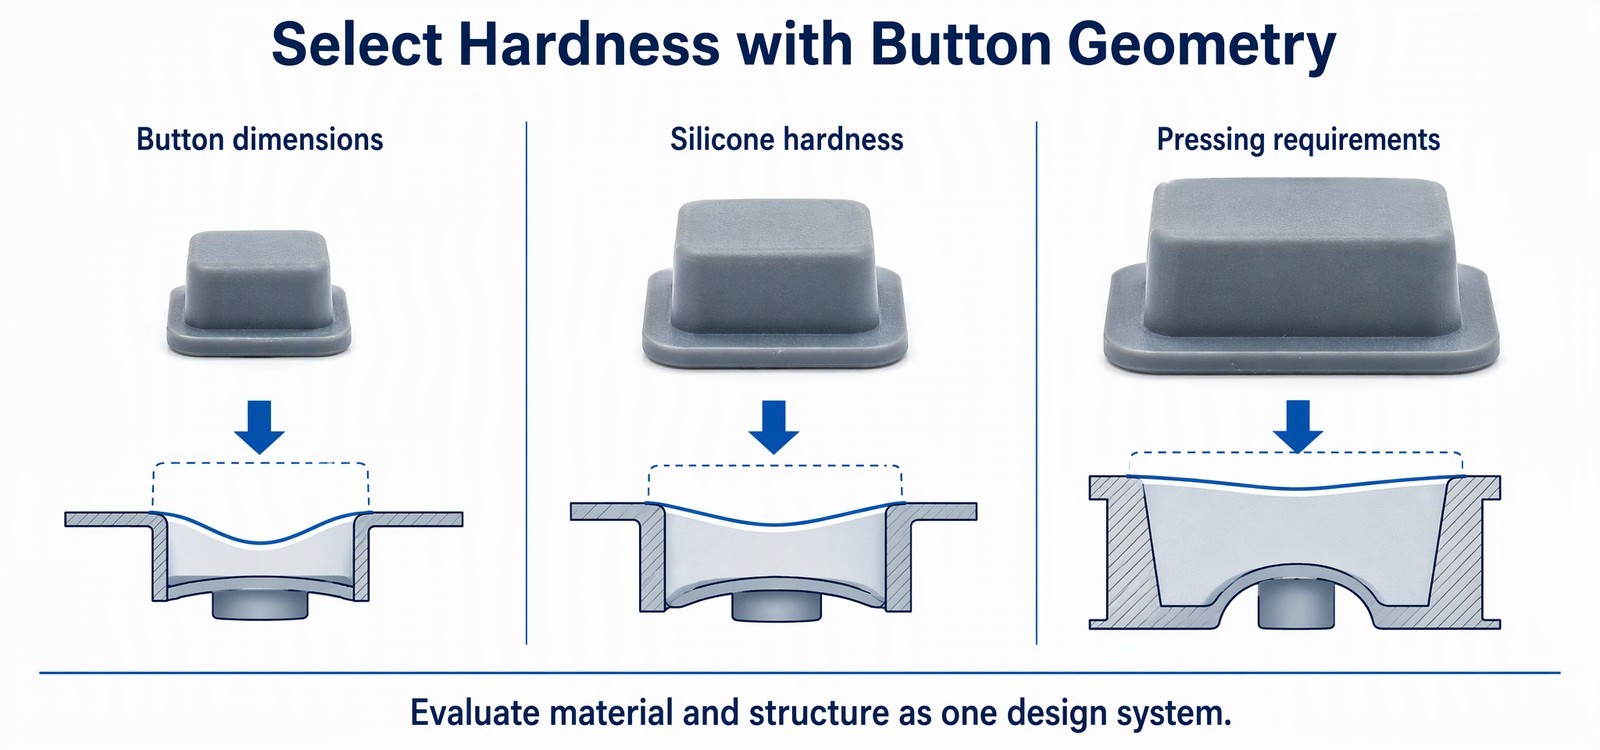
Rubber keypad design for laboratory analyzers starts from the fact that keys on one panel are rarely the same size. A large function key and a small navigation key need different material response to reach a similar feel, and applying one hardness across the panel is the most common reason a panel feels inconsistent between zones. The practical approach is to treat hardness as a variable that is solved per key group, then check that the solution is still one compound the factory can run without mixing errors.
Very soft compounds are tempting because they feel responsive on a bare hand. Through a glove they tend to feel vague, because the glove absorbs the small force difference the soft key relies on. Very hard compounds read clearly through gloves but resist the light touch that a technician uses when entering a value in a hurry. The useful target is usually a compound that gives a defined breakover at a force the gloved hand can still distinguish.
Hardness also interacts with demolding. A soft, thin-walled key can deform during ejection and cool out of shape, which shows up later as uneven key height rather than as a material problem. That is one reason to confirm the hardness against the geometry and the tool, not against a catalogue alone.
Consider chemical exposure during laboratory operation
Chemical resistance is usually discussed as a material property, which makes it sound like a yes or no answer. In a laboratory it is a question about the actual exposure: which agent, at what concentration, for how long, and how often the surface stays wet before it is wiped. A panel that is sprayed and left wet overnight is a different case from one that is wiped and dried immediately.
The honest way to specify it is to list the cleaning agents used on the instrument, the wipe frequency, and whether the agent is applied to the panel or to a cloth. With that list, material compatibility can be checked against real conditions, including the legend and the surface coating, which are often less resistant than the silicone itself.
Two practical warnings are worth repeating. First, a solvent that is harmless to the silicone can still lift a printed legend or dull a gloss coating, and the failure will look like a material failure. Second, repeated wiping with an aggressive agent removes the surface layer gradually, and the change is usually first visible as a patchy finish on the most touched keys rather than as a crack.
Balance flexibility, dimensional stability and long-term performance
Compression set is the deformation a material keeps after the load is removed, and it is the usual reason a key stops returning fully.
Flexibility is what makes a silicone key work and what makes it drift. The same elasticity that returns the button also allows it to creep under sustained load, so a key that is compressed by an over-tight housing will slowly take a set and stop returning fully. Compression set is therefore not only a material specification; it is a design outcome of how much the part is squeezed in the assembly.
Dimensional stability is the other side. A very soft compound with thin walls can be dimensionally stable at molding and unstable in service, because it moves under the loads the assembly applies. A harder compound holds its dimensions but transmits more of the assembly load into the housing.
Hardness tolerance deserves the same attention as nominal hardness. The material summary FromRubber publishes for a 70 Shore A compound states hardness as 70 ± 5, with tensile strength 5.0 MPa required and 5.7 MPa achieved. A band of that width is normal for silicone, and it is why a panel that mixes keys with very different wall sections can show a visible difference in feel between two production lots even when both sit inside the material specification. The practical response is to keep sections uniform, so the material band moves every key in the same direction instead of separating them.
The workable balance is usually found by keeping the section uniform, keeping the compression in the assembly low, and choosing a hardness band that the tool can hold consistently. On analyzers that run for years in the same enclosure, that combination matters more than any single material property.
What Keypad Structural Details Should Be Confirmed Before Mold Development?
The mold locks in the geometry, the parting line and the cavity layout. Every decision listed below becomes expensive after that point, and most of them can be settled in a short review of the housing drawing and the PCB.
Define button spacing and overall keypad dimensions
On a custom laboratory keypad, spacing has two jobs. It sets finger access, and it sets the space each key needs to deform without pulling its neighbours. Two keys can be far enough apart to look comfortable and still close enough that their silicone webs overlap, so the spacing should be checked against the web, not only against the caps.
The overall dimensions should be driven by the housing opening rather than by the PCB outline. A keypad dimensioned from the board tends to fit the electronics and fight the cover, and the cover is the part the operator sees. If the two conflict, the conflict should be resolved on paper, because a mold cannot resolve it.
Uniform spacing inside a group and a deliberate change of spacing between groups is a useful pattern on analyzer panels: the numeric block reads as a block, the function keys read as separate, and the operator's hand finds the boundary without looking.
Design the button domes according to different operating functions
Not every key on an analyzer should feel the same. A numeric key that is pressed in sequence benefits from a short, light action so the finger can move on. A start or abort key benefits from a more definite breakover, because a half-press there is worse than a slow press. Method keys that are pressed rarely can be firmer without any cost to the operator.
Building three different dome types into one tool is normal, but it changes the cavity layout and the fill pattern. Domes with different heights fill at different rates, and the tallest dome in a multi-cavity tool is often the one that shows incomplete fill first. That is a tooling conversation, and it is much cheaper before the cavity layout is fixed.
Confirm the conductive contact structure and PCB interface
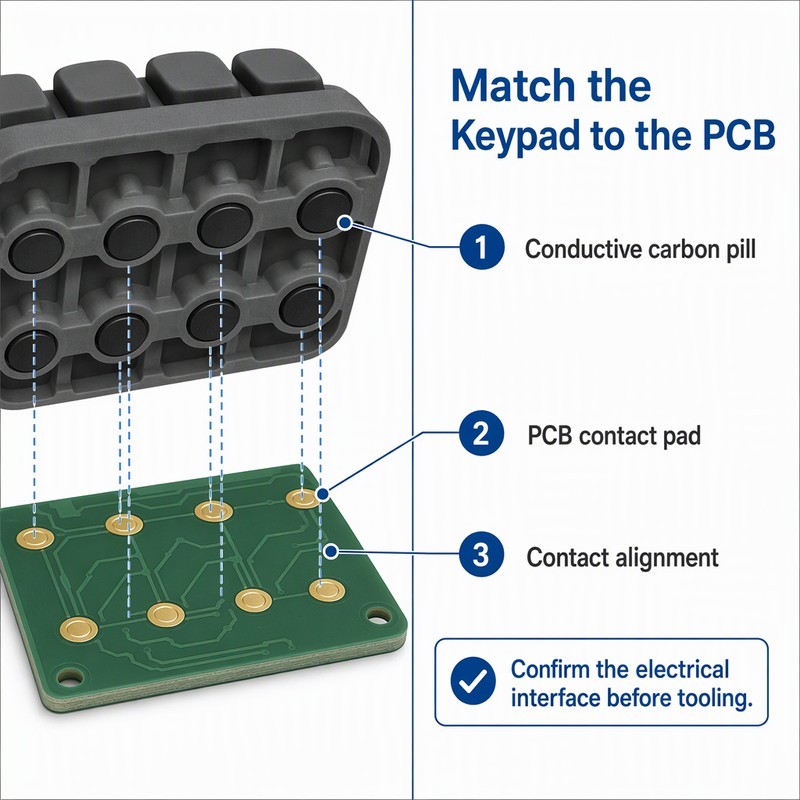
Carbon pills are vulcanized into the keypad, so their position is a tooling decision. The review should confirm three things: that each pill sits under the center of its button's travel, that the pill diameter leaves margin for the lateral movement of the press, and that the pad geometry on the PCB matches the pill pattern rather than the other way around.
When the contact layout changes after the tool exists, the usual workaround is to adjust the PCB, which is cheaper than the mold but still a change to a validated board. Catching the mismatch before tooling avoids both.
Contact resistance is not the only electrical question. The closure point in the travel matters as much: a pill that closes in the first third of the travel will register before the operator feels the breakover, and a pill that closes at the very bottom will feel dead until the key is fully pressed. Both are visible on a force-displacement curve with the circuit connected, which is a more useful test than a static resistance reading.
Plan legends, symbols and surface finishes
Legends can be molded in relief, printed and coated, or laser etched through a colored top layer. The choice affects the wall section at the key top, the durability under wiping, and the cost of a design change.
Molded legends have no ink to wear off and are the most resistant to wiping, but they depend on lighting to read well and they change the stiffness of the key top slightly. Printed legends give the sharpest contrast and the widest color range, and they need a coating that survives the cleaning agent listed earlier. Laser etching gives a durable, recessed mark that holds up well on colored keys, and it is the option that keeps contrast when the surface is glossy.
On a laboratory analyzer, contrast usually matters more than color. A legend that disappears under a wet wipe or a reflection from ceiling lights will be pressed by position rather than by reading, and that is exactly when the wrong method gets selected.
How to Avoid Common Customization Problems During Production
Prevent uneven button height and inconsistent appearance
Uneven key height is a molding symptom with several causes: cavity-to-cavity differences in the tool, uneven fill in a large plate, ejection marks on the base that tilt the part, or a base that cools with a slight bow. On a panel where keys are visually adjacent, a difference that is invisible on a single part becomes obvious on the instrument.
The control is dimensional inspection on the assembled panel, measured from the base to the top of each key, plus a flatness check on the base. Measuring one key per shot hides the problem, because the variation is usually across the panel rather than within a single key.
Reduce flash around button edges and parting lines
Flash on a button edge is worse than flash elsewhere, because the clearance around the button is small by design. A thin ring of excess material changes the effective diameter and turns a free key into a rubbing one, especially on a housing with a tight opening.
The parting line should be placed where flash is least harmful, which on most keypads means below the visible surface and outside the button's movement zone. Tooling precision and clamping force do the rest. Trimming inspection belongs in the process, not only in final inspection, because a trimming defect found at the end has already produced a batch.
Avoid assembly interference between the keypad and analyzer housing
Interference after assembly comes from features that do not appear on the keypad drawing: a boss, a rib, a connector housing, a label recess, or a screw boss that deflects the PCB upward. The keypad is usually the part that gets blamed, and it is usually the part with the least room to change.
The reliable check is a trial assembly with the real housing and the real board, tightened in the production sequence. If a key is stiff only in the assembled instrument, the cause is in the stack, and no change to the keypad alone will fix it without creating clearance somewhere else.
What Information Should Buyers Provide to a Silicone Keypad Manufacturer?
Technical drawings and 3D models of the analyzer interface
For OEM silicone keypad manufacturing, the starting set is the housing opening dimensions with tolerances, the depth from the opening to the PCB, the sealing surface, and the button layout with functions. A 3D model of the housing is useful for spotting interference, but the opening dimensions and tolerances are what the clearance calculation runs on.
Electrical requirements and PCB contact information
The contact pad layout with pad diameters and spacing, the expected switching behavior, and whether the keypad carries conductive pills, a membrane layer, or a metal dome assembly. If the analyzer uses a membrane switch behind a silicone overlay, that change should be stated up front, because it changes the part completely.
Material, color, marking and operating requirements
Hardness expectations by key group, color references by sample or code, legend method, surface finish, and the cleaning agents the instrument will see. Adding the operating temperature range and whether the panel is used with gloves helps the supplier judge the design rather than only quote it.
Prototype expectations and mass production requirements
Sample quantity, whether the samples are for fit only or for life testing, and the expected annual volume all change the tooling decision. A prototype tool built for a handful of parts and a production tool built for years of output are different investments, and the buyer should know which one the quotation covers.
It also helps to say what the acceptance criteria are. Fit only, fit plus function, or fit plus function plus a defined press count. Suppliers quote to the criteria they are given, and a vague criterion usually produces a sample that passes nothing in particular.
A short checklist before tooling
Housing opening dimensions with tolerances, PCB pad layout, button layout with functions, legend method, cleaning agents, key groups with different feel requirements, sample quantity and annual volume. With this list, a tooling review can be completed before any metal is cut, and the sample stage is used for confirmation rather than for discovery.
Frequently Asked Questions About Custom Laboratory Silicone Keypads
Can one silicone keypad include buttons with different pressing forces?
Yes. The difference comes from dome geometry, wall section and button height rather than from mixing compounds, which keeps the part moldable in one shot. The practical constraint is tooling: each distinct feel needs its own cavity geometry, so the number of variants should be decided before the cavity layout is fixed.
Can laboratory analyzer keypads use conductive carbon pills?
Yes, and they are the most common switching method on silicone keypads. The pills are molded into the underside of the keys and close against PCB contact pads. The design questions are pill position relative to the button travel, pill diameter against pad size, and the point in the travel where closure happens.
How do manufacturers prevent keypad misalignment during assembly?
By designing locating features into the part, usually small posts or edge tabs that engage the housing, and by keeping the keypad's outer profile referenced to the opening rather than to the PCB. Where the housing has no room for locating features, the keypad can be bonded to a carrier or held by a frame, but that decision belongs in the design review.
Can silicone keypads be customized to match existing analyzer housings?
Yes. Existing housings are the normal starting point for a custom keypad, and the work is done from the opening dimensions and the PCB layout. A physical sample of the housing is more useful than a drawing alone, because it shows the draft, the surface finish and the features that a drawing may simplify.
What this means for an analyzer keypad project
A laboratory analyzer keypad is a small part with an unusually large number of constraints: gloved hands, wet wipes, a cramped housing, a PCB that is not always parallel to the panel, and keys that must be found without looking. The projects that go smoothly are the ones where the layout was grouped by function, the hardness was solved per key group, and the legends were chosen against the actual cleaning agent rather than a generic claim.
FromRubber (Dongguan Bohao Electronic Technology Co., Ltd.) molds custom silicone keypads for laboratory equipment and silicone-to-plastic keypad assemblies for medical and industrial instruments, including carbon pill contacts, molded and laser-etched legends, and multi-group panels where each zone is drawn separately. The engineering team reviews housing drawings and PCB layouts before tooling, and works under ISO 9001:2015 and IATF 16949:2016 quality systems.
For an analyzer panel that needs a fit and feel review, send the opening dimensions and the pad layout through the keypad design and technical support page, or contact the engineering team directly. WhatsApp and WeChat: +86 18676210913. Panels built around instrument and meter housings are listed under custom silicone rubber meter and instrument keypads.
Sources and supporting reading
Reviewing a panel for a new analyzer?
Send the housing opening dimensions, the PCB pad layout and the cleaning agents the instrument will see. The review covers grouping, dome selection, legend method and clearance before tooling is quoted.
Start a keypad design review